Print a PDF
Nitro PDF Pro for Windows
With Nitro Pro you can print your PDF documents if you need paper copies for further processing or distribution. See
Alternatives to Printing for tools that may reduce the need to print.

Settings
Document
Customizable Settings
Collate Dropdown - This dropdown will only be available if multiple copies of the PDF are being printed
Page Format Dropdown
Tip : To verify the changes you make, scroll through the pages of your document via the page navigation buttons in the Preview area.
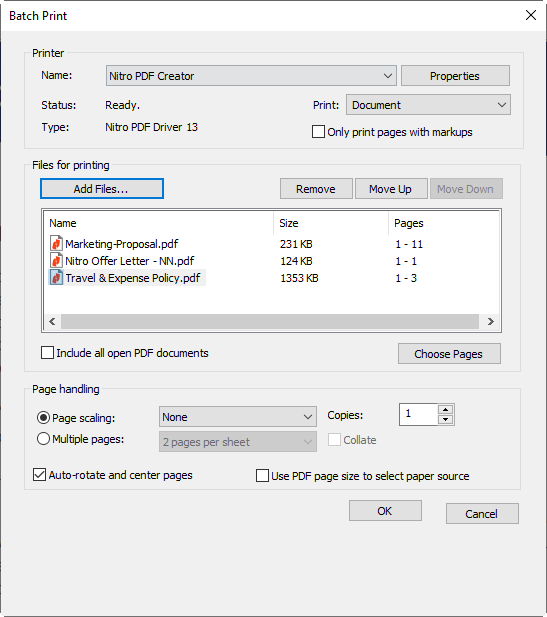
2. Click Add Files button to select the files that you wish to print in batch - you can use the Move Up, Move Down and Remove buttons to rearrange the printing order in the Batch print dialog.
3. Specify the printing options.
4. Click OK to start the Batch printing process.

Page Handling:
How to print a PDF document:
- Open your PDF document in Nitro Pro.
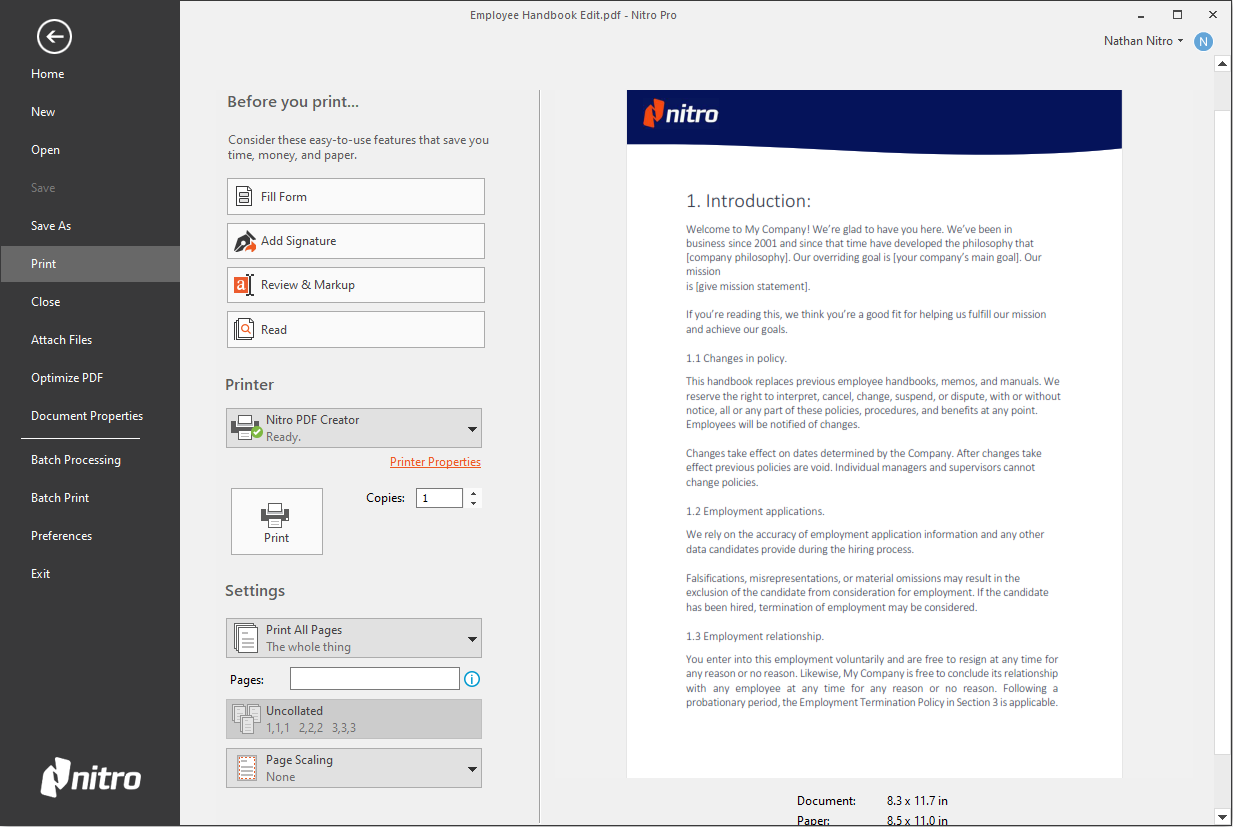
- In the File menu, select Print, or Ctrl+P, or click Print in the Quick Access Toolbar. The Print section of the Backstage view opens.
- Specify the following printing options.
- Click OK to start the print process.

Options for Printing
Printer- Name: Select one of the printers installed on your system
- Properties: Configure printing preferences related to your printer
- Copies: Print multiple copies of each page.
- Print: Include or exclude markups and stamps from the print job.
Settings
- You can print all or part of your document. Options for choosing what part of a document is printed can be found on the Settings dropdown
Document
- Print All Pages: Print the entire document.
- Print Markup Pages Only: Print only the pages that have markups. For more information on annotations and markup, see Annotation layer and content layer.
- Print Current Page: Print out only the current page displayed.
- Custom Print: Allow you to specify the exact pages required via entering the range in the Pages field underneath.
Customizable Settings
- Print Markup: All markups found within the PDF will be included in the printout.
- Print Stamps: Print stamp annotations and form fields.
- Only Print Odd Pages: Only the odd numbered pages from the selected page range will be printed.
- Only Print Even Pages: Only the even numbered pages from the selected page range will be printed.
- Reverse Pages: will print pages in reverse order.
Collate Dropdown - This dropdown will only be available if multiple copies of the PDF are being printed
- Collated: Print the entire page range once in sequence, then print the page range again.
- Uncollated: Each page will be printed out multiple times one after the other.
Page Format Dropdown
- Page scaling: Page content can be expanded to occupy the whole page, or shrunk if the content is outside the print-area. Expand is the default setting, so if your print is missing content then you can switch this setting to Shrink.
- Multiple pages: Print multiple instances of a page onto the same sheet.
- Booklet: Allows you to print multiple pages on the same sheet of paper in order if the pages are folded.
- Auto rotate and center pages: Automatically adjust page orientation to fit the selected paper size.
- Use PDF page size: Paper size will be automatically selected from the PDF page size
Tip : To verify the changes you make, scroll through the pages of your document via the page navigation buttons in the Preview area.
How to print a PDF in batch:
1. In the File menu, click Batch Print.2. Click Add Files button to select the files that you wish to print in batch - you can use the Move Up, Move Down and Remove buttons to rearrange the printing order in the Batch print dialog.
3. Specify the printing options.
4. Click OK to start the Batch printing process.

Options for Batch Printing
Printer- Name: Select one of the printers installed on your system
- Properties: Configure printing preferences related to your printer
- Print: Include or exclude markups and stamps from the print job. For more information on annotations and markup, see Annotation layer and content layer.
- Only print pages with markups: Pages without annotations are ignored
- Page range: Specify pages to send to the printer
- Subset: Filter the specified page range: all, odd, or even
Page Handling:
- Page scaling: Page content can be expanded to occupy the whole page, or shrunk if the content is outside the print-area. Expand is the default setting, so if your print is missing content then you can switch this setting to Shrink.
- Multiple pages: Print multiple instances of a page onto the same sheet.
- Copies: Print multiple copies of each page.
- Auto rotate and center pages: automatically adjust page orientation to fit the selected paper size.
- Use PDF page size: paper size will be automatically selected from the PDF page size.