Accessing, Managing, and Organizing Documents
Nitro PDF Pro leverages Apple’s Files to support file/ document management. Any Cloud service (e.g. OneDrive, Google Drive, Dropbox, etc.) that works with Apple’s Files will also be accessible with the Nitro PDF Pro for iPad & iPhone app. To learn more about Apple’s Files app see Apple’s Support documentation on the Files app.
Managing Folders
Create new folders, delete, manage and move documents between folders just as you would in the Files app.
Organizing Documents
Apple's Files view provides several options for searching and sorting your documents. Sort by Name, Date, Size, Kind, or Tags. View folders and documents as a list or as thumbnails.
To import a document into Nitro PDF Pro from Apple’s Files view (aka Documents View), or create a new document, tap “+” or “Create Document” respectively.
To share, move, delete, or documents, tap “Select” in the upper right to reveal these and other options.
For more options, select “More...”
User Interface
Toolbar
Upon launch, the tools Toolbar appears at the top of the screen of every PDF document by default.

Hide/Reveal Toolbar: To hide the Toolbar, tap in your document to make the toolbar disappear for more streamlined viewing. Tap again to make it reappear.
Close/Return to Files/ Documents view: Tap the X to close out the document or return to the Files / Documents view and navigate to another document. Perform any of the activities you're already familiar with in Apple's Files app, including managing your folders, moving document locations, ting, and sharing documents.
Show Sidebar: Open the navigation sidebar in Page view. Quickly navigate to another page of your document. NOTE: This button does not appear on the iPhone. Drag from just off the left side of the screen to the right to show the sidebar.
Reading Mode: Reading mode hides annotation and editing tools to allow users to focus on the reading experience.
Editing Mode: Editing mode reveals the Editing Bar which includes tools that allow users to annotate and edit a document’s content.
Search: Search the entire document for a word or phrase. Tap on a result to navigate to the page with the word or phrase selected.
Share: Share documents through Airdrop, Mail, or via a third-party app. Copy, print, flatten, add tags, or Save to Files.
More: Access General Settings to adjust scrolling and viewing options. Adjust editing default settings and connect to third-party tools, including settings for supported Bluetooth styluses.
Sidebar
The Sidebar provides quick navigation to Bookmarks (if any), Page Thumbnails, Table of Contents, and Annotations.
To reveal the Sidebar:
- Tap the Sidebar icon (iPad) in the Toolbar, or
- Drag your finger from the left edge of the screen toward the center to reveal the Sidebar.
To close the Sidebar:
- Tap the Sidebar icon (iPad) in the Toolbar, or
- Drag the Sidebar to the left to close it.
Page Thumbnails: Swipe to scroll up or down through the pages of a document. Tap on a page thumbnail to navigate to the selected page. Page numbers are noted at the bottom of each thumbnail.
Table of Contents: View the PDF Table of Contents if a document has a table of contents. Navigate to a page by tapping on an item.
Bookmarks: If your document has Bookmarks, bookmarks will be listed above the Table of Contents.
Annotations: View a list of your annotations (scribbles and text boxes) by page. Navigate to an annotation by tapping on it to select.
Editing Bar
The Editing bar is revealed in Editing mode. To select a tool for use, tap a tool in the Editing bar. When a tool is selected for use, it will be highlighted. Long-press on tools with the down arrowhead ⌄ to reveal other markup and editing tools in the same category.

Alternatively, when you tap on an object in the document to select, the tool specific to the selected object will be automatically selected in the Editing bar.
Edit Tool: Select an image, text box, or another object to move, resize, or delete.
Highlighting, Underline, Strikethrough: Add highlights, underlines, squiggle lines, or strikethroughs. Long-press on the tool in the Editing Bar to switch between tools.
Draw, Erase: Draw freehand with the Scribble/Draw tool. Erase your scribble lines with the eraser tool. Long-press on the tool in the Editing Bar to switch switch between tools.
Shapes: Add shapes such as Rectangle, Round Rectangle, Oval, Line, Polygons. Long-press on the tool in the Editing bar to switch between tools.
Text, Comments: Add text boxes or notes (stickies) to your document. Long-press on the tool in the Editing bar to switch between tools.
Note, Audio: Add comment boxes and audio annotations. Long-press on the tool in the Editing bar to switch between tools.
Library, Insert: Add items to your custom library, insert a Photo, Stamps, or Proofreading marks. Long-press on the tool in the Editing bar to switch between tools. (See Library)
Object Properties: Adjust properties for text, text, textboxes, annotations/objects such as lines and shapes added to documents. Tools remember their last chosen colors and properties. (See Editing Objects and Images)
Undo: Reverse recent changes made to a document. Supports multiple undo actions.
Settings / Preferences
Settings
Access Settings at the document level to access the following information.
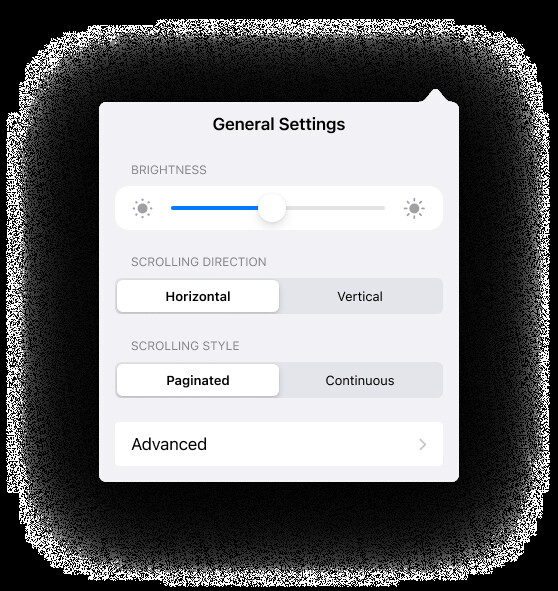
General Settings: Adjust screen Brightness, Scrolling, and Page view styles. Also access Advanced settings, including editing defaults such as Annotation Author, any third-party integrations, and stylus settings for Bluetooth (non-Apple Pencil) supported styluses. General settings are also available in Page view under More .
Help: Access Nitro PDF Pro (iOS) documentation, educational resources, or contact Nitro.
- User Guide: The application ships with extensive online help. From the application in Files / Document view, select Settings > Help to view the User Guide in your default web browser.
- Video Tutorial: Learn basic Nitro PDF Pro app functions, tips and tricks, and workflows.
- Contact Support: Contact Nitro’s customer support team for help.
Legal: Nitro terms and policies related.
- Acknowledgments: Software copyright and license agreements.
- Privacy Policy: Nitro attaches great importance to protecting your privacy. Our privacy policy clarifies how we process personal data. If you have questions, feel free to contact us.
Account: Log in with a Nitro Account.
- Log in with a Nitro Account: If you purchased a license through Nitro, please log into your account to access Nitro PDF Pro features.
Advanced
Advanced settings are available from Files / Documents view under Settings > General as well as in Page view under More . Adjust preferences for the following:
- Scrolling: Select your preferred direction of document scrolling, Horizontal or Vertical. (See Scrolling).
- View Pages: Select your preferred type of scrolling, Paginated or Continuous. Scrolling type respects preferences specified in document scrolling. (See Scrolling).
- Advanced: Adjust Annotation Author, and third-party integration settings.
- Annotation Author: Defaults to “Not Set”. Select your Author name to appear in Comments and certain Stamps.
- Integrations: Third-party app integrations and settings are listed here.
- Stylus: Set up a special supported pressures-sensitive or Bluetooth stylus (non-Apple Pencil). Apple Pencil works automatically with Nitro PDF Pro—no special settings are required. (See Styluses & Integrations).
Dark Mode
Nitro PDF Pro supports dark mode on iPad and iPhones. Turn on Dark Mode through your device’s Control Center, the Settings app, or with Siri.
Human Interface Notes
Gestures
Use basic gestures such as tap, long-press (touch and hold), swipe, scroll, and zoom to navigate the Nitro PDF Pro for iPad & iPhone app. If you are using a Trackpad or Magic Mouse with your mobile device, please review the gestures that correspond to your trackpad or mouse. For more information on basic or advanced gestures on your iPad, iPhone, or Vision Pro, please refer to your device’s User Guide for your respective operating system.
iPad basic gestures: https://support.apple.com/en-sg/guide/ipad/ipad2c09c4d4/ipados
iPhone basic gestures: https://support.apple.com/en-sg/guide/iphone/iph75e97af9b/ios
Vision Pro basic gestures: https://support.apple.com/en-sg/guide/apple-vision-pro/tan1e2a29e00/visionos
Contextual Menus
Contextual menus, or shortcut menus, enable easy access to capabilities related to your current context. The contextual menu will also include broader iPadOS or iOS offerings such as access to the Dictionary.
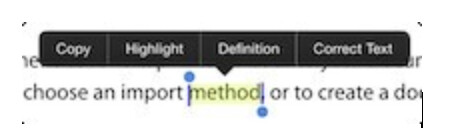
- To use the context menu, tap/touch and hold to select a specific word or object. The context menu will appear as a dialog bubble hovering above your selection.
- Tools appearing in the context menu relate to your specific selection. Options in the context menu may include access to the Dictionary, Copy, Highlight markup tools, Correct Text editing, and more.
- Arrow through the menu options to find the tool you need.
Accessibility
Nitro PDF Pro uses Apple’s VoiceOver to support accessibility. To learn about VoiceOver and adjust your settings, see Apple’s support documentation on VoiceOver for the iPad and iPhone for your corresponding operating system.