
/Card-Page%20Previews-AI.png?width=1200&height=800&name=Card-Page%20Previews-AI.png)

How to Print a PDF on Mac
The PDF has been ubiquitous in the modern workplace. It’s so ubiquitous, in fact, that if you search for “PDF” on Google Trends and compare it to other popular topics, it maintains a steady presence that often ranks higher than searches for even the NFL and Major League Baseball.
As it turns out, there’s more to printing a PDF than just hitting Command + P. But you shouldn’t have to use a complicated app on your phone to figure it out, either. You may need to save a PDF for later. You may “print” to a PDF file, which means saving to PDF, before the literal printing. It all gets kind of confusing. In this article, we’ll address how to print a PDF on a Mac, as well as some other options for bending PDFs to do your will.
Setting Up Your PDF for Printing
Before you do anything else, you need to set up your PDF for printing. We know—you may be impatient to print a document now. But if you follow these steps, you’ll not only learn how to do it properly, but you probably won’t need to go back and fix an error. Here’s what to do.
- With the PDF open, enter File -> Page Setup. You can also hit Command + Shift + P on your Mac keyboard.
- One of the most common issues is getting the PDF to match your paper size. If you know that your PDF is already matched to the size of the paper in your printer, you’ll be good to go.
- However, if you need to adjust that for a specific paper size, go to File -> Page Setup -> Paper Size.
- Select the paper size according to your specific dimensions.
- Select the printer you’re using. (Note: in most cases, there should just be one option).
From there, you’re ready to print.
Master the PDF Print Dialog
Don’t fear the Dialog. And if you set it to the appropriate settings when using Nitro PDF Pro for Mac, you’ll actually make things easier on yourself in the future. Here’s how to do it.
We all know that when you have a PDF open and you hit Command + P to print, it’s not that simple. Your software will always bring up a new window. This is known as the PDF Print Dialog.
Getting Your PDF File to Print on a Mac via the PDF Print Dialog:
- With Nitro PDF Pro for Mac open, go to File -> Print, or Command + P. This opens the PDF Print Dialog.
- Click Show Details if you want to look at more advanced settings. Or, if your PDF looks good to go, you can simply select “Print” and get started.
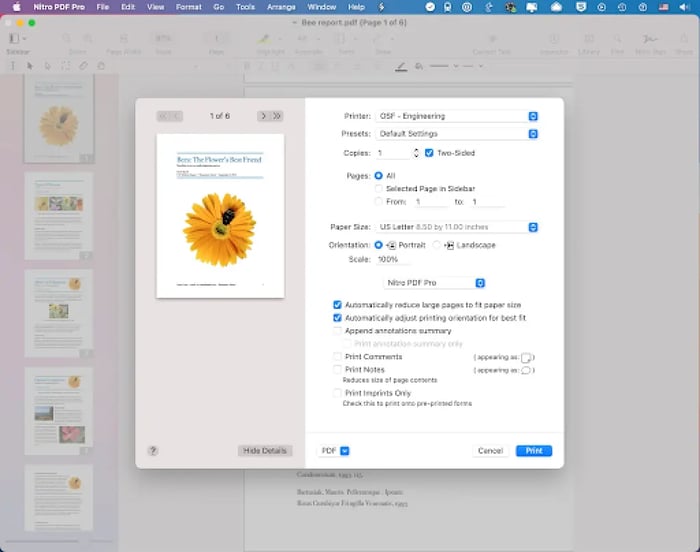
- If you opened Show Details, you’ll be able to select any additional settings that you may need to change.
A Detailed Explanation of Print Dialog Settings You Can Change
- Automatically reduce large pages to fit your paper size. This is an automatic process that will shrink down large pages so they fit within the paper size you have loaded and selected with the Print Dialog. In Nitro PDF Pro for Mac, this is checked automatically. If you’re having formatting issues with the size of your paper, you might want to experiment with changing settings manually.
- Automatically adjust printing orientation for best fit. Your “printing orientation” typically has two options: standard and landscape. Your Nitro PDF Pro for Mac software will automatically check for the appropriate settings given your PDF. Similar to the above, this will be checked automatically as well. You can change the settings within Nitro PDF Pro for Mac if you want to switch to manual.
- Append annotations summary. This will “add” a page of annotations at the end of your document, if necessary.
- Print annotation summary only. Want to check the annotations summary first? You can Print annotation summary only to see what this will look like. Or you can use this feature to print a separate annotation summary for anyone who wants to see it.
- Print comments .
Selectthis feature will include the PDF comments along with the PDF itself.
- Print notes. Want your notes to appear in the printout of the PDF as well?
Select Print Notes and you’ll be able to see everything that was included in the notes.
- Print imprints only. If you don’t want the original text of the document to print, but only the “imprints”—i.e., the answer fields you’ve included—then you can use “Print imprints only.” This is essentially the entire list of notes, comments, and annotations you’ve attached to the PDF. For example, if you were writing the first draft of a novel, and only wanted to see the notes attached to it for a to-do list for editing that novel, you could do so with “print imprints only.”
Making Use of the “PDF” Button
You’ll notice in the PDF Print Dialog that there is a PDF button. If you click it, you’ll have more options for working with your document. For example, you can click Save as PDF… which will output a PDF file of the document you wanted to print.
Why do this? Well, you’ll notice that we spent a lot of the previous section talking about notes and annotations. What if you want to take a PDF, add annotations, and then “flatten” those annotations to become a permanent part of your document? That’s right: you’d click Save as PDF… to flatten everything and create a new file with the properties you want.
Printing Non-Continuous Pages
What happens if you have a PDF, you’re ready to print it, but you know that you only want the first ten pages of a twenty-page document? You shouldn’t be expected to waste paper simply because you’re not sure how to figure it out. Fortunately, it’s much easier than you might think.
- Go to File -> Print or press Command + P on your Mac. This brings up your old friend, the Print Dialog.
- Click Show Details to expand the Print Dialog and see all of your available options.
- Under the last pop-up menu available, it should be set to Nitro PDF Pro for Mac.
- Under this pop-up menu, select Paper Handling.
- Now choose your specific settings to make sure that the non-continuous pages print out only.
Interested in mastering the art of printing out PDFs on a Mac? Fortunately, Nitro Pro for Mac helps simplify the process. Rather than having you figure out complicated software, you can simply work with your PDFs on your own terms once you have Nitro PDF Pro for Mac. But you don’t have to wait to get started. Try downloading a free trial of Nitro PDF Pro for Macto check out the instructions on this post and to see if this software is right for you.