How to send an eSignature request from Nitro Sign
You can send a signature request from Nitro Sign, Nitro PDF Pro, or Microsoft Word. This article explains how to send a signature request using Nitro Sign.
To learn how to send a request from Nitro PDF Pro, see the related article.
Initiate a Signature Request
1. On the eSign dashboard, click the Send documents button located in the top right corner.

Alternatively, you can click the Send documents button on the My documents list or start from an individual document.
2. On the resulting screen, choose one or more documents from your local desktop, any of the cloud storage providers, or a pre-existing Nitro Sign document, and click Continue.
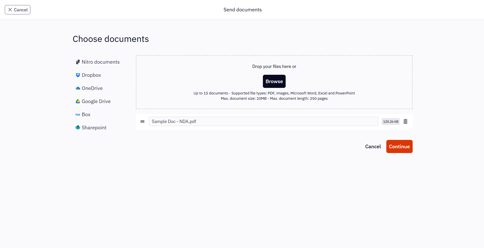
Note: Nitro Sign imposes following limits with regards to envelopes and the documents they contain:
-
Maximum number of documents per envelope: 15
-
Maximum document size: 20MB.
-
Maximum number of pages per document: 250
-
It can occur that non-PDF files, such as .docx or .jpg, exceed above document limits after conversion to PDF. If this occurs the converted file will not be accepted.
-
Maximum total size of the envelope: 300MB
-
Maximum amount of recipients per envelope: 200
-
Password protected or restricted PDFs are not allowed for signing
Add Recipients and Fields
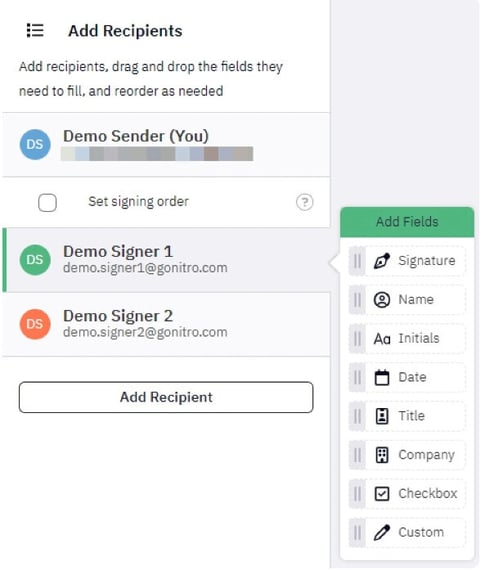
1. Once the signature request has been initiated, on the Add recipients screen, click the Add recipient button.
2. In the pop-up window, fill in the recipient’s information: Name (optional) and Email (required).
3. Click Add to continue, or click Cancel to discard the action.

At this stage, you also have the option to add Multi-Factor Authentication (MFA) or Two-factor Authentication (2FA) with SMS to this signature request. Learn more about MFA with access code or 2FA with SMS.
4. If you would like to add more than one signer to the signature request, click Add recipient in the Recipients panel and enter the other signers' details
5. You can also edit or remove a recipient by clicking on the designated button that appears when hovering over the recipient in the Recipients panel.
Note: You can easily navigate or manage the documents in your envelope by clicking on the Documents icon next to the Recipients panel.
%20(1).png?width=670&height=345&name=Step-1%20(9)%20(1).png)
6. To add signature fields to the document:
-
-
-
Click on a recipient in the Recipients panel.
-
Drag and drop the required field(s) to the appropriate position(s) on the documents.
-
-
Note: Each field can be moved, resized, or changed to a different field type.
7. After the fields for each recipient have been placed on the documents in the envelope, click Continue in the bottom right corner.
Note: You can also save the envelope as a draft to be sent later.
You can also use the Auto detect fields feature to have the system detect and place recipients and fields for you. Learn more about the Auto Detect Fields feature in this article.
Send an eSignature Request
1. Review the list of recipients and the prepared documents.
2. Optional: Customize the email subject and message that will be sent with the signature request.
3. Optional: Add CC recipients. They will have view-only access to the documents and will receive a notification when all recipients have signed.
4. You can create a new message layout. A message layout includes the email subject and message text used in the signature request.
You can:
-
Set the new layout as your default, or
-
Save it to your list of layouts for future use.
To create a message layout:
-
Click Layouts
-
Click New message layout
-
Edit the subject and message as needed
-
Click Save
.jpeg?width=670&height=317&name=download%20(1).jpeg)
Note: Variable fields can be used, in the instance where your name is saved in your profile this will be used, otherwise your email address will be used.
6. Click Request signature to finish the preparation and send the envelope out for signature.