An artifact in a PDF document is a type of element used to provide visual structure but is not meant to be read or interacted with by screen readers or other assistive technologies.
This means that when an artifact is used in a PDF document, it is effectively hidden from assistive technologies, allowing them to skip over the content and focus on the meaningful parts of the document.
Examples of artifacts in a PDF document might include decorative images, background colors and other design elements used to enhance the document's visual appearance. They do not provide any meaningful information to the user.
To manage artifacts
1. Open your PDF document with Nitro PDF Pro.
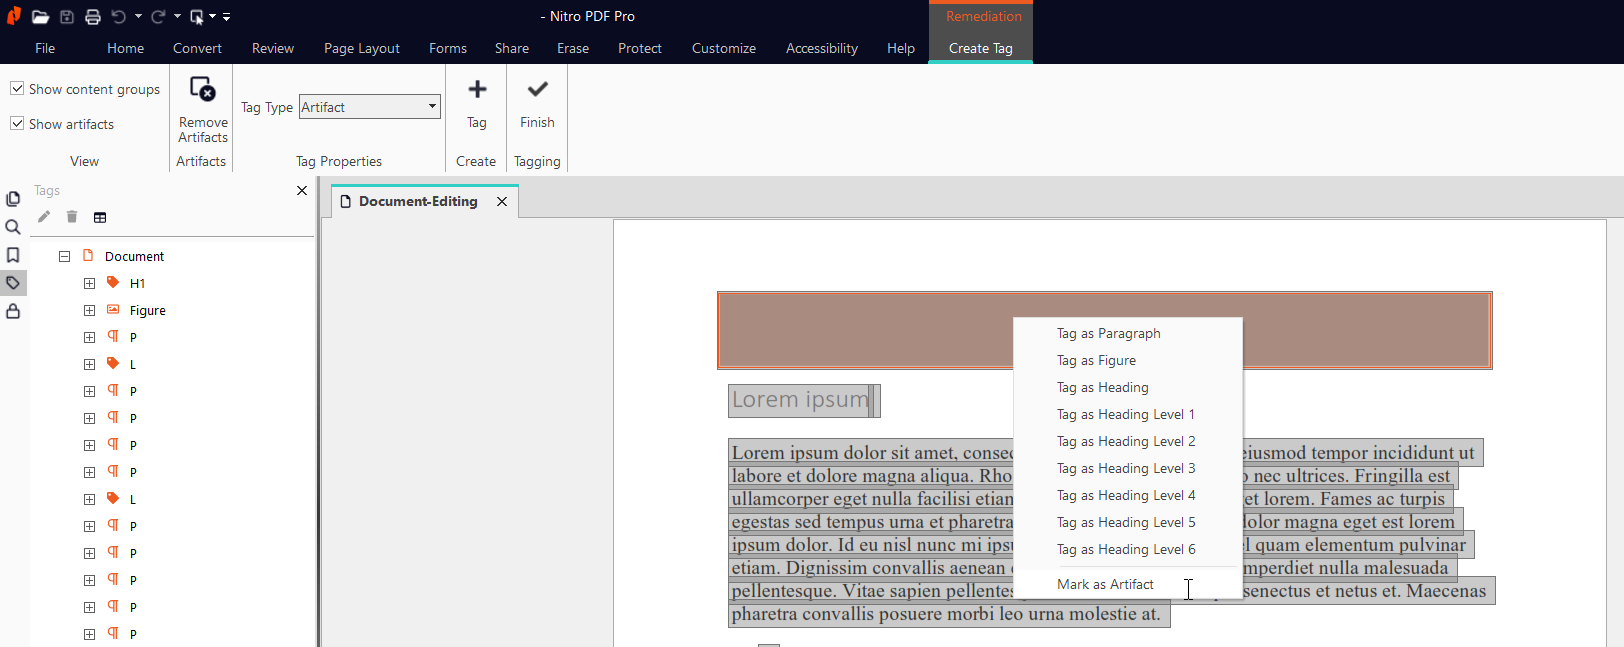
2. Enable the tag creation mode by selecting Accessibility > Create Tag.

When this mode is enabled, the Remediation tab opens and the Ribbon shows the options for tag creation. In this mode, you can add, remove, show and hide artifacts.
3. To mark a piece of content as an artifact, select an image or another visual element and do one of the following:

4. To highlight all artifacts in your document, with the Remediation tab selected, on the Ribbon, select the Show artifacts checkbox.
All artifacts are highlighted with a gray color and a dark gray outline.
5. To remove artifacts, do the following:
6. Click
Save on the top bar or press
Ctrl+S on your keyboard to save your changes.
This means that when an artifact is used in a PDF document, it is effectively hidden from assistive technologies, allowing them to skip over the content and focus on the meaningful parts of the document.
Examples of artifacts in a PDF document might include decorative images, background colors and other design elements used to enhance the document's visual appearance. They do not provide any meaningful information to the user.
To manage artifacts
1. Open your PDF document with Nitro PDF Pro.
2. Enable the tag creation mode by selecting Accessibility > Create Tag.
When this mode is enabled, the Remediation tab opens and the Ribbon shows the options for tag creation. In this mode, you can add, remove, show and hide artifacts.
3. To mark a piece of content as an artifact, select an image or another visual element and do one of the following:
- With the Remediation tab selected, select Artifact from the Tag Type list on the Ribbon, and click Tag.
- Right-click the selected content and select Mark as Artifact from the context menu.
4. To highlight all artifacts in your document, with the Remediation tab selected, on the Ribbon, select the Show artifacts checkbox.
All artifacts are highlighted with a gray color and a dark gray outline.
5. To remove artifacts, do the following:
- With the Remediation tab selected, on the Ribbon, click Remove Artifacts.
- In the Remove Artifacts from Pages popup, from the Page range list, select one of the following options and click Remove:
Option
Description
All
To remove all existing artifacts from the document
Current Page
To remove the artifacts present on the current page
Pages
To remove artifacts from the specific pages. For example, 2-3.